2010-08-15

Aperture - Part 2 (Depth of Field)

This is a lens my mother had in her antique/vintage camera collection:

Trioplan 100mm 2.8 Lens

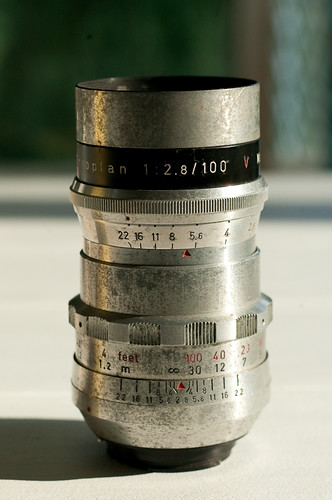
Don't let its looks fool you. This is a solid old chrome lens. I hope to get an adapter for my canon body and take photos like this soon! For now this will be a great tool for demonstrating aperture. Below are three different photos with three different aperture settings.


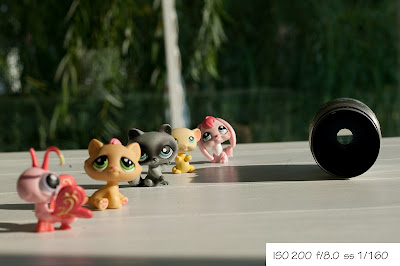
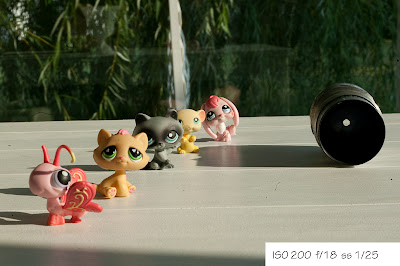
As you an see there is a considerable difference in the amount of light entering the camera at the different aperture settings(f 2.8, f 5.6, f 22).

Here is what changing the Aperture can do for you. Say we use the above lens at 2.8 and take a photo. It is allowing a lot of light to spill in the camera and expose the image on the sensor/film. Because so much light is coming in, the camera will need to use a faster shutter speed. Since the shutter speed is so fast the image is hitting the camera and disappearing very quickly. So what you are focused on, will be clear as a whistle, and anything in the foreground or background will become blurred. If we set the camera to use this lens at f/22 then you will find your shutter stays open a lot longer. In this case the image is falling on the film/sensor for a longer period of time and more of the image will be clear. Probably the entire scene.

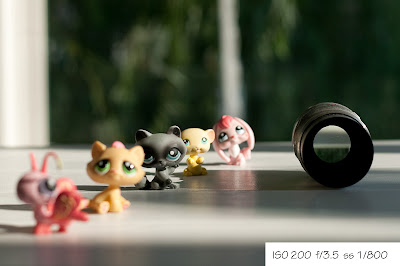
Here are some images to show how changing the aperture affects the resulting image (click to enlarge):
From acceptable circle of confusion


From acceptable circle of confusion


From acceptable circle of confusion

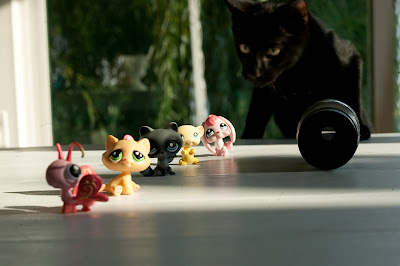
Do-doom (Jaws sound effect)
From acceptable circle of confusion


From acceptable circle of confusion


From acceptable circle of confusion

Do-doom, do-doom, do-doom (Jaws -suspense building music)
From acceptable circle of confusion


And there they go...
From acceptable circle of confusion


I hope when you compare the Aperture setting in the photos you can see how the area in focus increases as you raise the Aperture. Also notice how much the shutter speed changed dramatically. Once you get the hang of things you can use that knowledge to your advantage too.

You can play with your aperture setting on your own camera. You don't have to know what to set the other numbers to. Today's cameras will choose that for you. So look in your manual for how to set your camera to Aperture Priority (this might be Av or A). Then play.

How do we know what aperture to set the camera at to capture a scene? It is really up to you. This is where you can become creative. The camera has to have the 'right' amount of light coming in the camera, the right balance of ISO, Shutter Speed, and Aperture to properly expose the sensor/film. You can shuffle the 'weight' among the three aspects. Once you learn what the different Apertures and Shutter Speeds can do for your image you just 'balance' the other two options to allow for your creative choice.

If you want to try the low apertures and love the look of a really blurry background (bokeh) then you might consider buying a cheap, but really good 'prime' lens. These lenses aren't zoom. You'll have to move yourself backward and forward to control what is in your photo. It really isn't a big deal. The cheapest way to go about this is buying a 50mm lens. You can buy them new from a place like BHphotovideo for right at $100. They are such a bargain!! You can browse some great 50mm work on the Nifty Fifty Flickr Group.

I'll discuss shutter speed at a future time. Here is further reading until then:
Oh yes, my tip for remembering which 'way' is the larger and smaller aperture. It is confusing because the closer to 1 you go the larger the aperture is. But think of it as fractions. 1 is the entire size of the lens opening....f/8 more like an eighth and f/22 more like a 1/22 of the entire opening. It isn't like that exactly, but it helps. Or you can say....if I want 1 thing in focus use the number closest to 1 if I want 22 things in focus between me and the background use the larger f/22 number. Hope that helps.

Aperture - Part 1

What is aperture?

As I said in the ISO entry we can imagine our camera to function like our eyes. If we imagine blinking to be like the shutter then our iris or pupil (black circle of our eye) is like the camera's lens aperture. In dim light our pupil enlarges to let in more light and in bright light it constricts. This performs the same function in our camera. What we see is the light that reflects off objects. That is what our camera is also capturing. As light enters the camera through the lens, it falls on and exposes the film (or sensor in digital cameras). Too much light and the photo is 'burned' white and too little light and the photo is black. The camera's job is to expose the film/sensor to the proper amount of light. Modern day cameras do a great job at this by balancing the aperture and shutter speed to let the correct amount of light in, but by understanding the effects of manipulating the aperture we can make a normal photo exceptional.

As I said the aperture is like our iris. In cameras the aperture is formed by overlaping pieces of metal, or blades, which can slide together to form a smaller or larger opening. I hope you can see the blades in this photo. Some lenses have a lot of blades like this one, but some have very few (as few as two, I think).


In photography we assign numbers to the aperture size so we can share and know the size for future reference. You might hear it referred to as the aperture number, f value, or f stop. The numbers will look something like 1.0, 1.8, 2.8, 3.6, 5.6, 8, 11, 18, or 22, for example. A f value of 1.0 would be very large and an f value of 22 is very small. It seems confusing, but I'll tell you a trick to remembering them later.


As I said, when your shutter opens light spills in through the aperture in your lens and onto the film/sensor. If the aperture is very large a lot if light is spilling in, so to keep too much light from entering the shutter speed will be faster. So lenses that can go all the way to 1.1, 1.8, 2.8 are considered fast lenses. Many kit or consumer grade zooms can only go to about 4.5.

Why do you want to be able to go to larger apertures? Well there are a few advantages. One, since it is letting more light in, these lenses can take photos in lower light settings without using a flash. On camera flashes can be harsh and ruin a otherwise great photo by losing the subtle shadows that give a photo its depth. Two, the image resulting from a lens with a large aperture will yeild a sharper, crisper photograph with beautiful details when you zoom in or crop the photo. Third controlling the aperture controls what is in focus in the photograph. The photo below is a good example because it is easy to see the blur in the foreground the small plane that is in focus and then the blurred background.


Some say it is the ability to select the area of focus that sets apart a slr camera (the ones with interchangeable lenses) from a point and shoot.

In the next blog entry I will tell you how to control your depth of field (what is in focus and what is not) by adjusting your aperture.

2010-08-05

What is ISO?

The ISO Game Show:

Announcer: Welcome to the ISO Game Show! Ok folks on our left we have the LOW Family from Monkey's Eyebrow, KY and on our right is the HIGH Family from Saint-Louis-du-Ha! Ha!, Quebec. (We don't make this stuff up people.) Each family will be given stacks of blocks in all colors. Their job is to arrange the blocks on their sensor table to match the pattern they are shown on the big screen before you.

Ok Round One! On your mark. Get set. Go! The LOW family are surprisingly organized! Look at them go. The HIGH family is fast, but seem a little messy and less organized. Times up! Lets see how they did. Wow a perfect score for the LOW family! They matched every block correctly on their sensor table. The HIGH family did a fine job, but with some mistakes. Excellent job folks, but this round the points go to the LOW family.

Now time for round two. On your marks. Get set. Go! Ok they have a good start and, OH NO! The light is dimming on our monitor. What's happening? I do apologize, Folks. This is a big inconvenience. The contestants are stunned and time is running out. Keep playing! Can they do it? The LOW family is just standing there. I don't think they can see the screen. But look at that HIGH family! Wow, they are rushing and bumping into each other, but they seem to be putting something together. Time is up. Lets see how they did. The LOW family has....Nothing. Oh sorry! No points there. The high ISO family has....well it is the general pattern, but with some mistakes, still an unbelievable job for the HIGH family! ....


So what just happened? If you think of our camera like our eye. The light come in, shines on the back of the eye; there specialized cells interpret what we see and send that information to our brain. In the camera the light falls on either film or a sensor. The sensor can be made to react more quickly or slowly according by changing your ISO settings. In the case of the LOW ISO family above, in good light they provided the sensor with the most precise copy of what they saw, but couldn't see in the dark light. The HIGH ISO did not do as well, but they were able to work in darker lighting situation.

So just keep that in mind when you are taking photos. You want the clearest photo possible that a low ISO setting can give you, but when there is less available light high ISO can come to your rescue. You will sacrifice the possibility of adding grain the image. The higher the ISO the more grain. What setting number do you want to work with? Well it depends on your camera. The new digital cameras are reaching unreal ISO levels never achieved with film and are taking clearer photos at higher ISO's. My camera isn't one of those! I keep my camera at the lowest possible ISO. That is usually around ISO 100. My camera stinks at ISO 800, lets not even talk about ISO 1600, so I work hard to keep it as low as the camera will let me.

I know this is a very simplistic view of ISO. If you want more technical information Wikipedia offers wonderful articles explaining the mathematics of it all. I hope this helps people grasp a general understanding which will come together when we combine ISO, Shutter Speed, and Aperture to shoot manually. Also remember the above is the same concept for film. You can buy higher speed film for lower light situations. Also, the high shutter speed needed to capture fast action(sports) also lets less light in the camera, so a higher ISO is useful in fast action situations.

I apologize for the lack of photos in this article. I might add some examples of a grainy photo soon.